Installing in a Virtual Machine
KDE Linux only ships a .raw image and requires UEFI firmware. As such, getting it to run in a VM may be a different experience than you might be accustomed to. Here are instructions for common VM software:
Oracle VirtualBox
- Download the latest
.rawimage. - Convert the raw file to a VMDK image:
# On Linux & UNIX systems
VBoxManage convertfromraw kde-linux_*.raw kdelinux.vmdk --format VMDK
# On Windows systems using powershell
& 'C:\Program Files\Oracle\VirtualBox\VBoxManage.exe' convertfromraw (Get-ChildItem kde-linux_*.raw).FullName kdelinux2.vmdk --format VMDK
- Click the New button in the toolbar to create a new virtual machine.
- Select your desired VM Name and VM Folder.
- For OS, choose Linux.
- For OS Distribution, choose ArchLinux.
- For OS Version, choose Arch Linux (64-bit).
- Click Next and enter the Specify virtual hardware section.
- Choose CPU count (minimum 2, ideally 4+) and memory (minimum 2 GB, ideally 4+).
- Set the disk size to at least 15 GB, ideally more than 20.
- Click Next to review the summary, then Finish.
- With the new virtual machine selected, click Settings.
- Click Expert at the top to switch to Expert Mode.
- In the System section, enable the UEFI Feature by ticking the checkbox. Don't forget this step. Without UEFI enabled, the VMDK image will not boot!
- In the Storage section, select Controller: SATA and click the Add Hard Disk icon to the right.
- In the Hard Disk Selector window, click Add in the toolbar and select the
kdelinux.vmdkfile you created at the start. - After you've added it to the Hard Disk Selector, click Choose to attach it.
- Click OK to save and close the settings. You can now start the virtual machine and install KDE Linux.
Virtual Machine Manager (virt-manager)
- Download the latest
.rawimage. - File > New Virtual Machine > Import existing disk image. Click the Forward button.
- In Provide the existing storage path: > Browse, find raw file that you downloaded. Click the Choose Volume button.
- In Choose the operating system you are installing: write Arch Linux. Click the Forward button.
- In Choose Memory and CPU settings:, choose CPU count (minimum 2, ideally 4+) and memory (minimum 2 GB, ideally 4+). Click the Forward button.
- Enable the checkbox Customize configuration before install. Click the Finish button.
- The configuration window for the new VM is opened. In Overview > Details > Firmware: select UEFI.
- On the bottom left, click the button Add Hardware.
- Add a storage disk of some reasonable size. E.g. Storage > Details tab > select the radio button Create a disk image for the virtual machine and set the disk size to at least 15 GB, ideally more than 20.Click the Finish button.
- In the top left of the window, click the Begin Installation button. The VM will start.
If it shows an error message saying Unable to connect to libvirt qemu:///system error, run:
# On Debian-based operating systems
sudo systemctl enable --now libvirtd.service

# On other operating systems
sudo systemctl enable --now libvirt.service
If the VM fails to boot and shows the error No bootable option or device found.. Click Enter; this will start the UEFI user interface. Disable Secure Boot from the UEFI user interface: Device Manager > Secure Boot Configuration > Attempt Secure Boot, disable the checkbox by pressing the Space key. Click Enter to close the message box Configuration changed. Press F10 to save, then y. Press the Escape key twice and select Reset.
Install the operating system to the second virtual disk, that means, in the KDE Linux Installer wizard, page Partitions, from the Select storage device: combo box select vdb - 20 GiB. After installing the OS is done, shut down the VM.
VirtIO Disk 1 contains the raw file that you have downloaded.
Edit the VM configuration, right click on VirtIO Disk 1 > Remove Hardware (decide if you want to also delete the raw file that you have downloaded), Delete.
Now, VirtIO Disk 1 is the only virtual storage of the VM and contains the BTRFS storage where you have installed the KDE Linux operating system. Start the VM.
To connect to KDE Linux using SSH, you can enable the sshd systemd service:
sudo systemctl enable --now sshd
Note: Clipboard sync from the VM to host (QEMU/virt-manager) does not work due to an upstream issue, though there is a workaround.
QEMU
You can boot the raw file in a QEMU virtual machine:
qemu-system-x86_64 -enable-kvm -m 4G -smp 4 \
  -drive if=pflash,format=raw,readonly=on,file=/usr/share/OVMF/x64/OVMF_CODE.4m.fd \
  -drive format=raw,file=kde-linux.raw
XCP-ng
- Download the latest
.rawimage. - In Xen Orchestra, select Import > Disk, choose a storage (not ISO) repository to hold the
.rawfile, drop the.rawfile on the target, and upload it by selecting the Import button. - Select New > VM and choose the desired host pool.
- Under Info, set Template to Generic Linux UEFI and enter a name.
- Under Performance, choose CPU count (minimum 2, ideally 4+) and memory (minimum 2 GB, ideally 4+).
- Under Install Settings, select PXE (neither PXE nor ISO boot options will be used, but the form requires selecting one of the two).
- If no network interface is listed, select Add Interface to ensure that the VM has a network connection.
- Under Disks, select the storage repository where the VM's virtual disk should be stored, and adjust the size to a reasonable amount (a minimum of 15 GiB is required).
- Under Advanced, select Show Advanced Settings and uncheck Boot VM after creation.
- Select Create to finalize creation of the VM.
- With the new VM's page showing in Xen Orchestra, select the Disk tab and select Attach Disk.
- Select the
.rawimage from the drop down directly beneath the New Disk and Attach Disk buttons, check Read Only, then select Attach. - Select the Advanced tab, and under Boot Order, drag Hard Disk to the top and click Save.
- Select the Console tab and start the VM.
- Install KDE Linux using the Install System wizard in the live environment, then after the installation is completed, shut down the operating system to cleanly power off the VM.
- Return to the Disks tab and use the Remove VDI from this VM icon button on the .raw file to remove the installation media from the VM.
- The KDE Linux VM is now ready for use.
UTM (macOS)
UTM is an open-source virtual machine app for macOS that uses QEMU under the hood.
- Download the latest
.rawimage. - Create a new virtual machine and select Emulate. Do not select Virtualize, as Apple's Virtualization framework is incompatible with the KDE Linux image.
- Select Linux as the operating system.
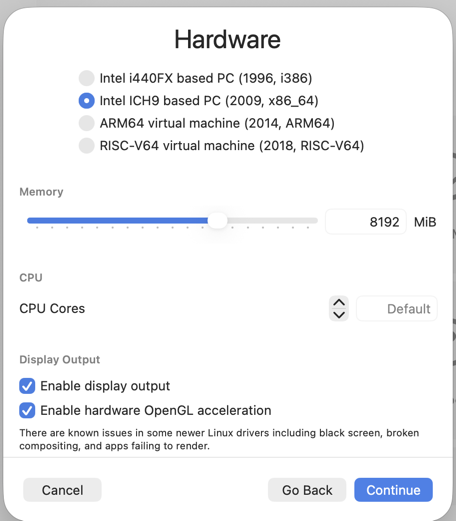
- Set memory and CPU cores. Enable Display Output and Hardware OpenGL Acceleration.
- For the boot device, select ISO Image and browse to the
.rawfile you downloaded.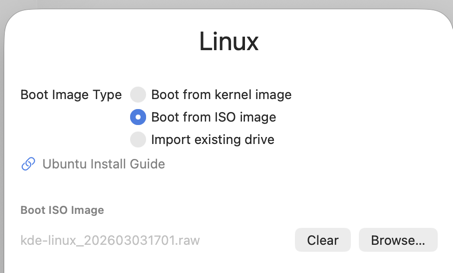
- Set the storage size for the virtual drive.
- Skip the shared directory setup and save the VM.
- Open the VM settings. You will see two drives: the
.rawimage and the empty destination disk. Select the.rawdrive and set Image Type to Disk Image, Interface to USB, and disable Read Only.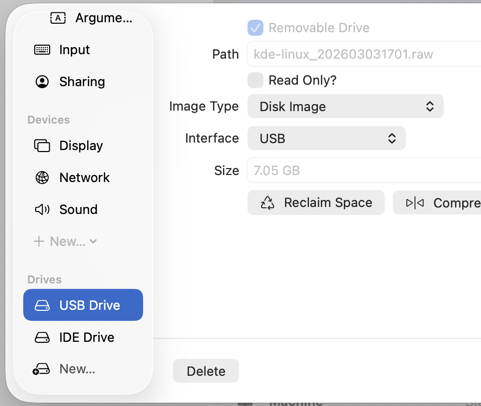
- Save the settings and start the VM. Go through the KDE Linux installer.
- After installation completes, shut down the VM, remove the
.rawinstaller drive, and start the VM again. KDE Linux will boot from the installed disk.
Article contributed by Nate Graham, and Rudolf Psenicnik under the CC-BY-4.0 license.